I’ve been a fan of kebabs for as long as I can remember, and Seekh Kebabs are one of my absolute favorites. These are those long, spiced meat kebabs you often see sizzling on skewers. They are juicy, flavorful, and so versatile. Today I’m making them with ground beef, but you can also use lamb or even chicken, and they turn out just as delicious.
What I love about seekh kebabs is that you can cook them any way you like. You can pan-fry them on the stovetop, bake and broil them in the oven, or take them out to the grill. However you do it, the spices, the fresh herbs mixed in just perfectly make them irresistible.
For me, seekh kebabs bring back so many memories. Growing up, kebabs were always a part of family get-togethers, and that spiced aroma takes me right back every time I make them. And if you’ve been following GypsyPlate, you know I love kebabs of all kinds, from Kofta Kebab to Shish Kebab to Shish Tawook. Each one has its own unique flavor, and Seekh Kebabs are another must-have in that lineup.
What is Seekh Kebab
Seekh Kebab, or Sheekh Kebab, is one of the most popular kebabs in South Asian cuisine. The word seekh means “skewer” in Hindi and Urdu, which explains how these kebabs are made. Ground or minced meat is mixed with a blend of spices and herbs, then shaped around long skewers into sausage-like logs. They are cooked over an open flame, in a tandoor, or on a grill, which gives them their distinct flavor and char. Today, you can also find them pan-fried, baked, or broiled, making them easy to prepare in any kitchen.
Seekh Kebabs trace their roots to the Mughal era in India, when Persian and Central Asian culinary traditions blended with local flavors. Skewered meats were common in those regions, and cooks in the Indian subcontinent adapted the technique with their own spices.
Over time, Seekh Kebabs became a favorite across India, Pakistan, Bangladesh, and Afghanistan. They are enjoyed everywhere from weddings and feasts to busy street stalls.
Ingredients Notes
You will find exact ingredients amounts in the recipe card at the end of this post. Here ae the things needed:
- Ground Meat – I’m using ground beef, which makes juicy and flavorful kebabs. Lamb works beautifully too, and you can even try chicken if you prefer.
- Onion – Finely chopped so it blends into the mixture without leaving chunks. This adds sweetness and depth of flavor.
- Garlic – Crushed garlic gives the kebabs their bold aroma.
- Ginger – Fresh ginger adds warmth and that distinctive kick.
- Fresh Chili Pepper – I am using finely chopped serrano for heat. Jalapeño works as a good substitute.
- Cilantro – Freshly chopped cilantro brightens up the kebabs with freshness.
- Mint – A little finely chopped mint gives a cool, refreshing note that balances the spices.
- Salt and Pepper – Essential for seasoning.
- Spice Powders – A combination of Kashmiri red chili powder (or paprika as substitute), red chili flakes, cumin powder, coriander powder, and garam masala powder. Together, they create the deep, layered flavor profile that makes Seekh Kebabs so special.
- Baking Soda – Helps tenderize the meat and keeps the kebabs light.
- Oil – Used both in the mixture and for cooking, it keeps the kebabs moist and prevents sticking.

How to Make Seekh Kebabs
1. Prepare the Meat Mixture: Pat any excess moisture from the ground beef and place it into a large mixing bowl. Keeping the mixture dry helps the kebabs hold together. Add onion, garlic, ginger, serrano chili, cilantro, mint, salt, pepper, spice powders (Kashmiri red chili, red chili flakes, cumin, coriander, garam masala), baking soda, and oil. Mix everything well with your hands until fully combined (wear gloves if you like).
2. Marinate: Cover the mixture and refrigerate for at least 1 hour to let the flavors develop. Overnight marination gives the best results.
3. Test Seasoning (Optional): Heat a small pan with a little oil and cook a small piece of the mixture. Taste and adjust salt or spices as needed.
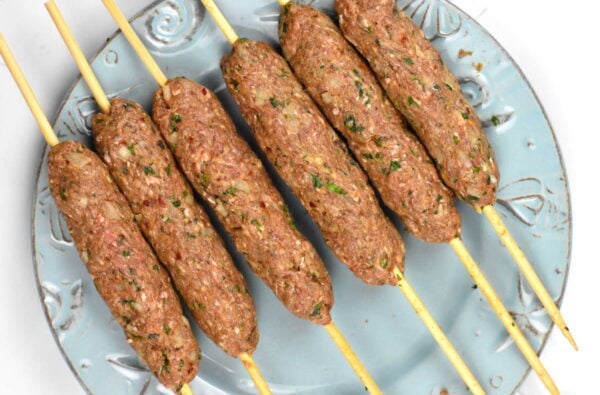
4. Shape the Kebabs: With oiled hands, take about ¼ cup of the mixture (golf ball sized) and form into a round. Thread a skewer through the center, then shape the meat into a long log, about 5–6 inches in length. Repeat with the remaining mixture.
5. Cook the Kebabs:
- Pan-Frying: Heat a nonstick or cast iron skillet with enough oil to coat the bottom over medium-high heat. Place kebabs without crowding and cook, turning with tongs, until browned on all sides and fully cooked, about 7–8 minutes. Internal temperature should reach 165°F.
- Baking: Preheat oven to 425°F. Line a baking sheet with foil, arrange kebabs, and brush lightly with oil or butter. Bake on the middle rack for 10–15 minutes, turning halfway through. Then broil on High for 2 minutes per side to add color.
- Grilling: Preheat an outdoor grill to high heat and oil the grate. Grill kebabs, turning often, until browned and cooked through, about 10 minutes, or until internal temperature reaches 165°F.
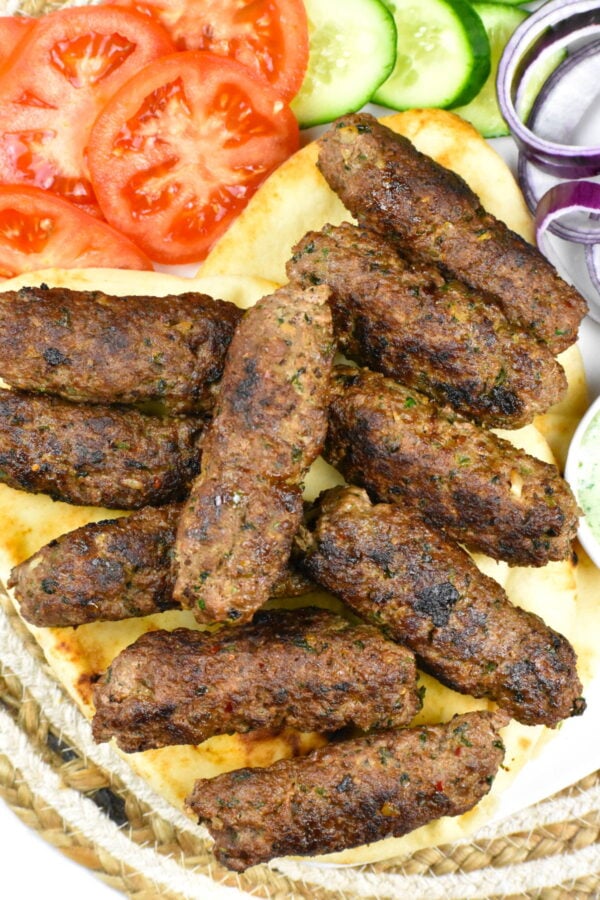
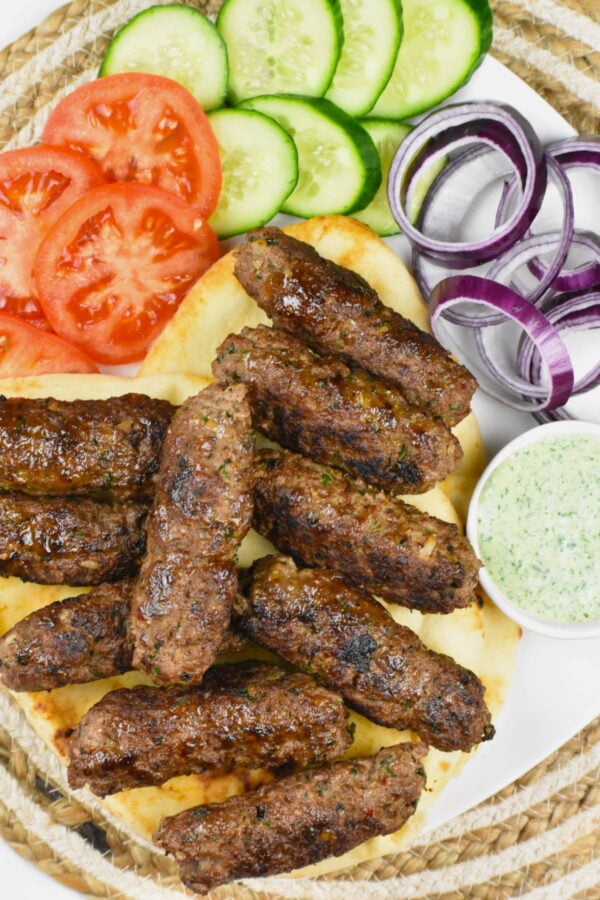
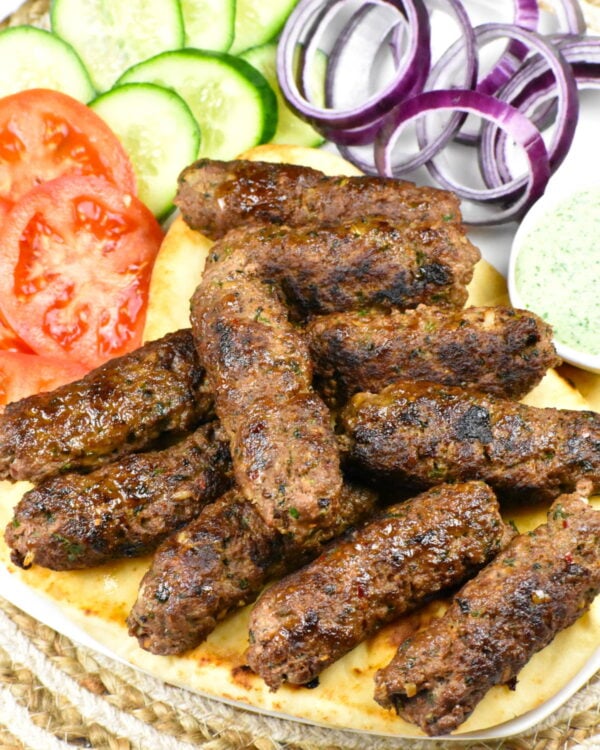
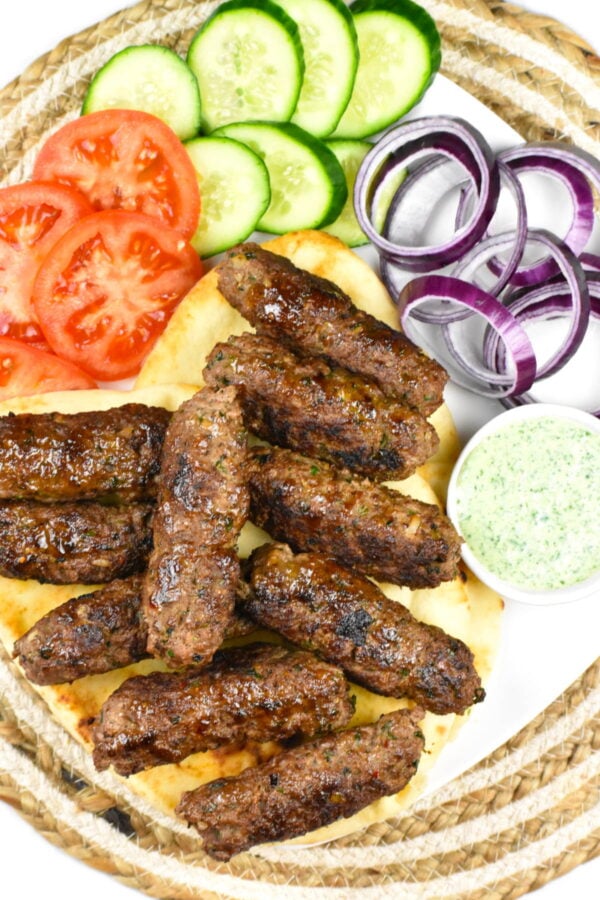
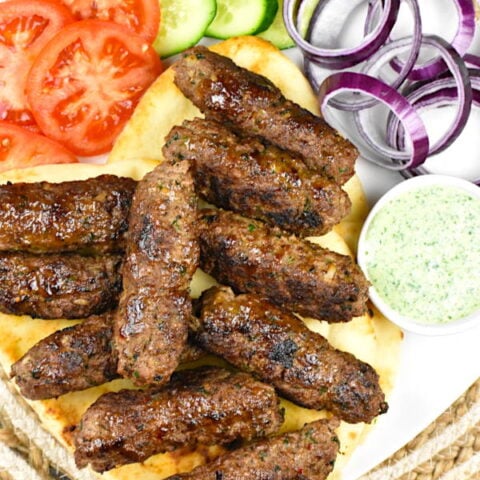
6. Serve: Transfer kebabs to a serving plate and enjoy immediately with cilantro-mint chutney, salad, pita bread, or pilaf.
Alpana’s Tips
- Keep the mixture dry – I always make sure to pat the ground meat dry and chop the onion finely. Too much moisture can make the kebabs fall apart.
- Marinate longer for flavor – An hour works, but if I have time, I leave the mixture overnight in the fridge. The flavors really deepen that way.
- Oil your hands – When shaping the kebabs, I keep my hands lightly oiled. It makes the mixture easier to handle and helps the kebabs stick to the skewers.
- Don’t overcrowd the pan – If I’m pan-frying, I cook in batches so the kebabs sear properly instead of steaming.
- Check for seasoning – I always cook a tiny test patty first. It’s the easiest way to see if I need more salt or spice before shaping all the kebabs.
- Cook to the right temperature – A meat thermometer is my best friend here. I pull the kebabs at 165°F so they stay juicy without being undercooked.
- Rest before serving – I let the kebabs rest for a couple of minutes after cooking. This keeps the juices inside and makes them even more flavorful.
Serving Suggestions
I love serving Seekh Kebabs hot off the pan or grill with plenty of fresh sides. For me, Mint-Cilantro Chutney is a must, that cool freshness balances the spices so well. They’re great with naan or paratha, and I often make a simple salad or pickled onions to go alongside. If I’m feeling extra, I’ll put them with a fluffy rice pilaf for a full meal. However you pair them, they never last long at the table!
Storing and Freezing
Seekh Kebabs are great for meal prep. I often shape them and freeze them raw on a tray first so they don’t stick together. Then I transfer them into a container or freezer bag. They keep well for up to a month. When I’m ready to cook, I thaw them in the fridge overnight and cook them as usual.
Give these exotic kebabs a try, Seekh Kebabs never disappoint! Packed with bold spices, fresh herbs, and that juicy tenderness, they’re always a hit whether I’m cooking for my family or serving guests. I love how easy they are to make, and no matter if I pan-fry, bake, or grill them, they come out delicious every single time. If you’re craving something flavorful and exciting, this Seekh Kebab recipe deserves a spot in your kitchen rotation.
More “meat-on-a-stick”:
Puerto Rican Pinchos
Pork Souvlaki
Teriyaki Skewers
Chicken Tikka
Picanha Steak
Gado Gado
Seekh Kebab (Ground Beef Skewers)
Juicy, spiced seekh kebabs made with ground beef or lamb, fresh herbs, and aromatic spices. Perfect grilled, baked, or pan-fried for a flavorful feast.
Ingredients
- 1.5 pounds ground beef (or use ground lamb as a substitute)
- ½ small onion, finely chopped
- 1 tablespoon garlic, crushed
- 1 tablespoon ginger, peeled and crushed
- ½-1 serrano chili pepper, finely chopped (or sub it with jalapeño)
- ⅓ cup cilantro, finely chopped
- 2 tablespoons fresh mint, finely chopped
- 1.5 teaspoons salt
- 1 teaspoon pepper
- 1.5 teaspoons Kashmiri red chili powder (or sub it with paprika)
- 1.5 teaspoons red chili flakes
- 1.5 teaspoons cumin powder
- 1.5 teaspoons coriander powder
- 1.5 teaspoons garam masala powder
- ½ teaspoon baking soda
- 1 tablespoon oil + more for searing or brushing while baking as needed
Instructions
- Place ground beef in a large bowl. Pat any excess moisture from the ground beef and place it into a large mixing bowl (keeping the kebab mixture dry helps the kebabs hold together). Add all the remaining ingredients to the ground beef.
- Mix all the ingredients well with hands (wear gloves if you have them).
- Cover the bowl with cling wrap, then leave place it in the fridge to marinate for at least 1 hour, overnight is best.
- Test seasoning (optional): Heat a little oil in a small pan and cook a small piece of the beef mixture. Taste and adjust salt or spices if needed.
- Shape the kebabs: With oiled hands, take about ¼ cup of the meat mixture (golf ball sized) and form into a sphere. Thread a skewer through the meat, then use your fingers to shape it into a thin sausage-like log, about 5–6 inches long. Repeat with remaining mixture.
- For Pan- Frying: Heat a large nonstick or cast iron skillet over medium-high heat and add enough oil to coat the bottom. Place kebabs in the pan without crowding and cook, turning often with tongs, until browned on all sides, about 7-8 minutes total. The internal temperature should reach 165°F. Transfer to a plate lined with paper towels.
- For Baking: Preheat oven to 425°F. Line a baking sheet with foil and arrange the kebabs on it. Brush lightly with oil. Bake on the middle rack for 10-15 minutes, turning halfway through, until cooked through and lightly browned. Turn your broiler on High. Place the kebabs near the top rack and broil for 2 minutes. Flip and broil for another 1–2 minutes, until browned and slightly charred on the edges.
- For Grilling: Preheat an outdoor grill to high heat and brush the grate with oil. Cook skewers on the preheated grill, turning frequently, until nicely browned on all sides and meat is no longer pink in the center, about 10 minutes. An instant-read thermometer inserted into the center should read at least 165°F.
Note: If using wooden skewers and grilling, soak the skewers in water for at least 30 minutes prior to adding the maet. This will help prevent them from catching fire. - Serve immediately with cilantro-mint chutney, salad, pita bread or pilaf.
Notes
- How to Freeze (Meal Prep): Shape the kebabs and place them on a tray in a single layer. Freeze until solid, then transfer to an airtight container or freezer bag. This keeps them from sticking together. They can be frozen for up to 1 month. When ready to cook, thaw in the fridge overnight and cook as instructed.
Nutrition Information
Yield 10 Serving Size 1Amount Per Serving Calories 344Total Fat 22gSaturated Fat 8gTrans Fat 1gUnsaturated Fat 12gCholesterol 101mgSodium 759mgCarbohydrates 3gFiber 1gSugar 0gProtein 31g
Nutrition information is automatically calculated, so should only be used as an approximation.

Welcome to GypsyPlate! I'm Alpana, former worldwide tour manager and professional caterer, now full time blogger. I love exploring cuisines from around the world, and my recipes have been featured on sites such as MSN, Parade, Brit + Co, CNET and AOL. You can explore my entire collection of sortable recipes in my Recipe Index or learn more about me here.
Get griddling! Try these Blackstone Recipes!
Never miss a recipe!
Join the GypsyPlate mailing list and get easy dinner recipes right in your mailbox. From homestyle comfort food to exotic dishes from around the world.